
Having a well-designed and functional website has become a must for individuals and businesses looking to make their mark online. WordPress has become the go-to choice for website creation for numerous people and businesses worldwide.
With an intuitive interface, extensive customization options, and powerful plugins, WordPress has simplified the website creation process. As a result, anyone can now effortlessly create any type of website on WordPress with ever zero technical skill.
In this article, I’ll break down how to create a website on WordPress with a detailed step-by-step guide. Get started!
What Is WordPress and Why Is It So Popular?
WordPress is an open-source content management system by which you can create any type of website you can think of, whether it’s an eCommerce, membership, news portal, or simple blogging site. According to W3techs, WordPress is currently powering up over 43% of all websites worldwide.
And the biggest reason for its popularity is that you will find everything you need to create a website in WordPress and its repositories. For example, WordPress.org currently holds 9,500+ free themes and 59,000+ free versions of countless types of plugins.
Plus, you won’t find any shortage of tutorials and documentation regarding any aspect of WordPress which makes learning this CMS super easy. Even a beginner can operate WordPress and manage websites like a pro after a few days of practice.
Due to all these reasons, WordPress has become a popular content management system for creating and managing websites for both pros and beginners.
How to Create a Website on WordPress
Building a website typically involves a considerable amount of time and effort. Because you have to cover a series of steps, where in each step you have to complete many small and big tasks. Many people think that website creation mainly means the technical part, but actually, it is not.
Before getting into technical work, you need to carry out a lot of homework, which is also a part of the website creation process. Let’s begin.
Step 01: Choose WordPress.com or WordPress.org
When creating a new website, most people tend to select the WordPress.org version. But there is another WordPress version, named WordPress.com. Both of them have unique features, values, and benefits that most people don’t know yet.
However, knowing about these two platforms well and choosing the right one are crucial when creating a new website with WordPress.

WordPress.com is a hosted platform, meaning you can host your site on it. You don’t have to worry about the complexities of hosting, server management, or software updates. The platform takes care of these aspects for you.
As a result, you can focus on creating content and designing your website. This platform is particularly beneficial for beginners who don’t have technical expertise or prior experience with website development.
However, WordPress.com has some limitations. It offers you limited customization opportunities. You can’t create eCommerce websites. You can’t enjoy unconditional controlling power. You have to depend on its infrastructure for any modification.
WordPress.org is self-hosted, meaning you have to host your website on a separate hosting platform. You get optimum control over every aspect of your website, including its design, functionalities, customization, and underlying code.
A standout benefit is WordPress.org offers you a vast library of countless free themes and plugins to create the website as you want. WordPress.org is the best choice for creating any sort of eCommerce website.
WordPress.org offers unparalleled scalability. You have the freedom to optimize server settings, implement caching mechanisms, and utilize content delivery networks (CDNs) to enhance your site’s speed and responsiveness.
WordPress.org is best for designers, developers, business organizations, and agencies. Over time, this platform has become so much easier that today it’s a viable platform even for beginners.
Note: The following parts of the tutorial will be carried out based on the WordPress.org platform.
Step 02: Buy a Domain (Pick a Name for Your Business)
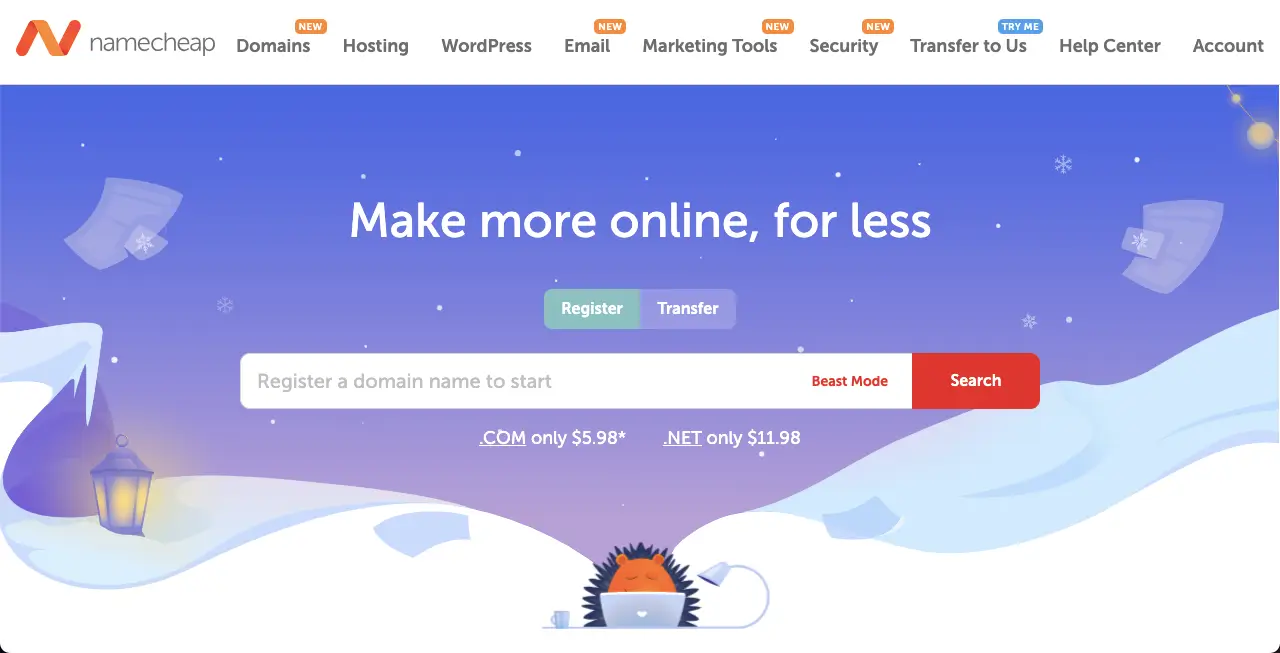
A domain is a unique address or name that identifies a website on the internet. A domain comprises two main components: a name and an extension. For example, in example.com, the word ‘example’ is the domain, and .com is the extension.
The best and most popular domain registrars are:
Several things you must consider when choosing and buying a domain. Make sure the domain name is relevant to your website’s content or purpose. It should be memorable and easy to spell, avoiding numbers, hyphens, or complicated words.
Select the appropriate extension. The most common and recognizable website extension is “.com,” but alternatives like “.org,” “.net,” or country-specific extensions (e.g., “.co.uk”) may also be relevant.
Review the pricing structure, as different registrars may offer varying prices for domain registration. Finally, check additional offers and services like domain forwarding, DNS management, email hosting, etc.
Step 03: Get a Hosting Package


Web hosting ensures that web resources are available and accessible on the internet. It enables web users and visitors to find content online whenever they search for the domain address on search engines through their browsers.
You must consider several points while deciding on a hosting provider. Evaluate your website’s needs, like expected traffic volume, storage requirements, software dependencies, etc.
Look for a hosting provider known for reliability and high uptime. Uptime means the amount of time your website is accessible to visitors. Plus, ensure the hosting server offers a cPanel. It must have a good reputation for high speed, content delivery networks (CDNs), and caching.
Check that the hosting server provides 24/7 support and allows you to scale up the storage limit anytime. Finally, look for the pricing plans, firewalls, malware scanning, SSL certificates, regular backups, and secure data centers.
Step 04: Open cPanel, Install WordPress, and Configure the Domain
There are two ways to install WordPress. You can do it by downloading the WordPress file or using cPanel. From my experience, using cPanel is the easiest way to do this, especially for beginners.
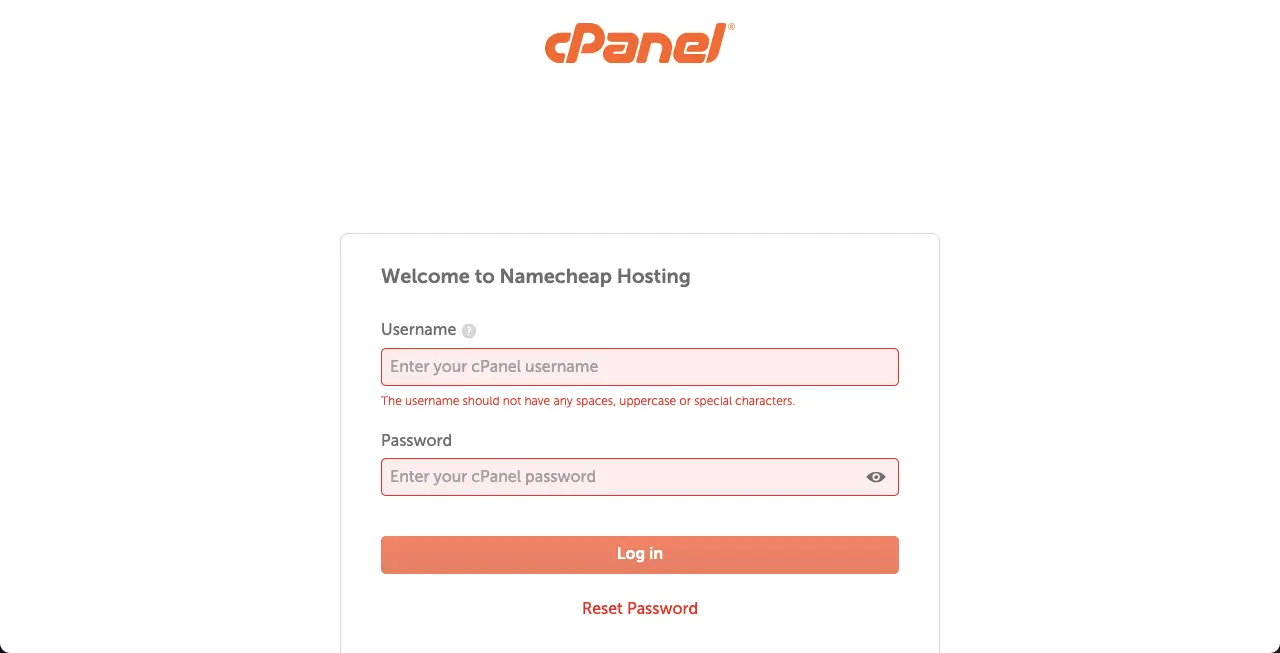
When you buy a hosting package, the hosting provider will provide you with access to their cPanel. Log in to the hosting account and open the cPanel.
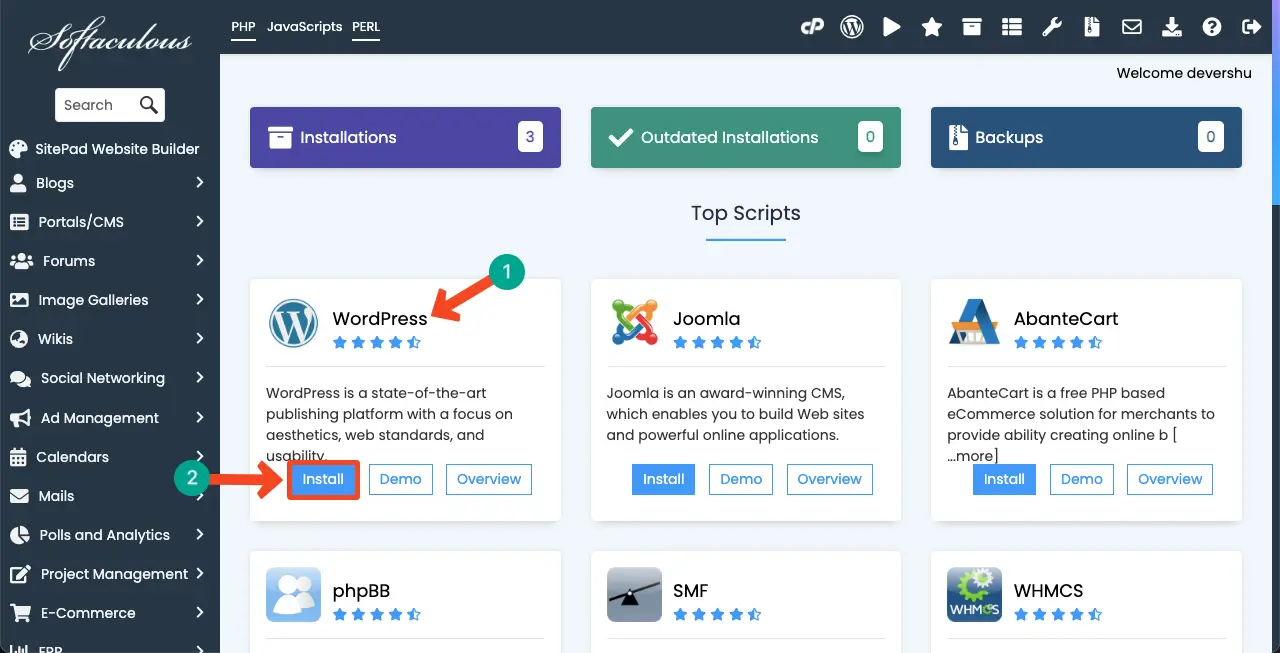
Within cPanel, look for the Softaculous Apps Installer section. This section provides an installer that includes WordPress. Click on the WordPress icon or name to proceed.
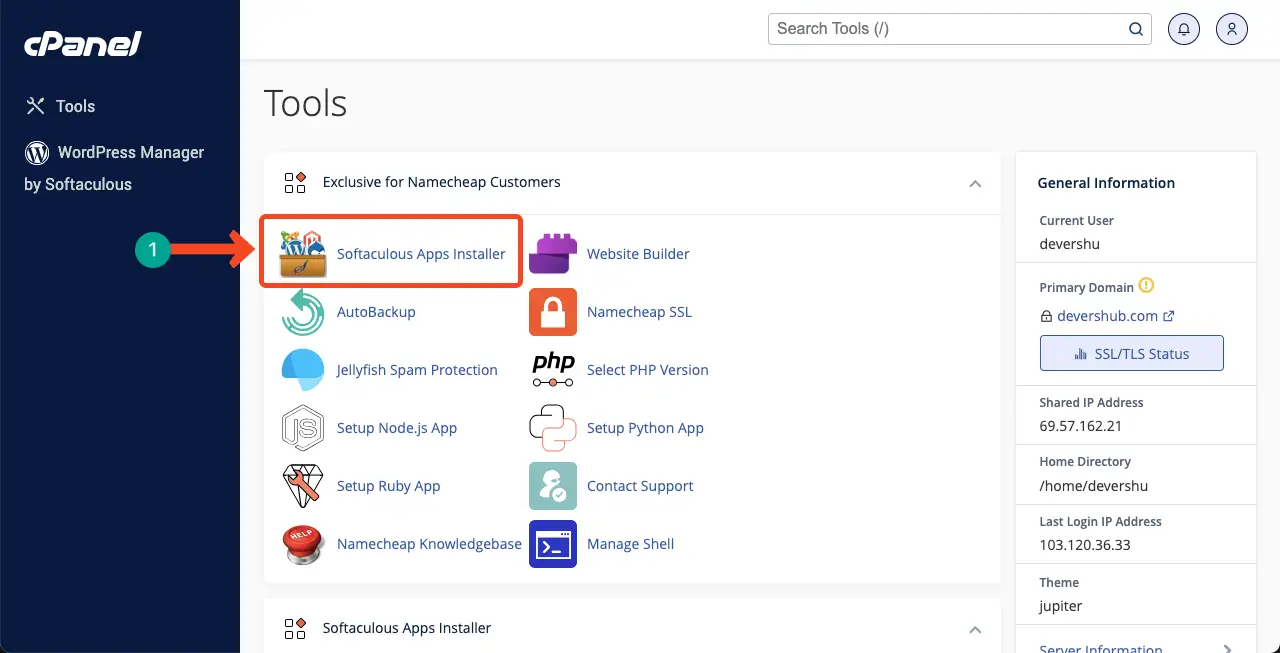
Click the Install or Install Now button on the WordPress installation page to initiate the installation process. You will be prompted to provide some information.
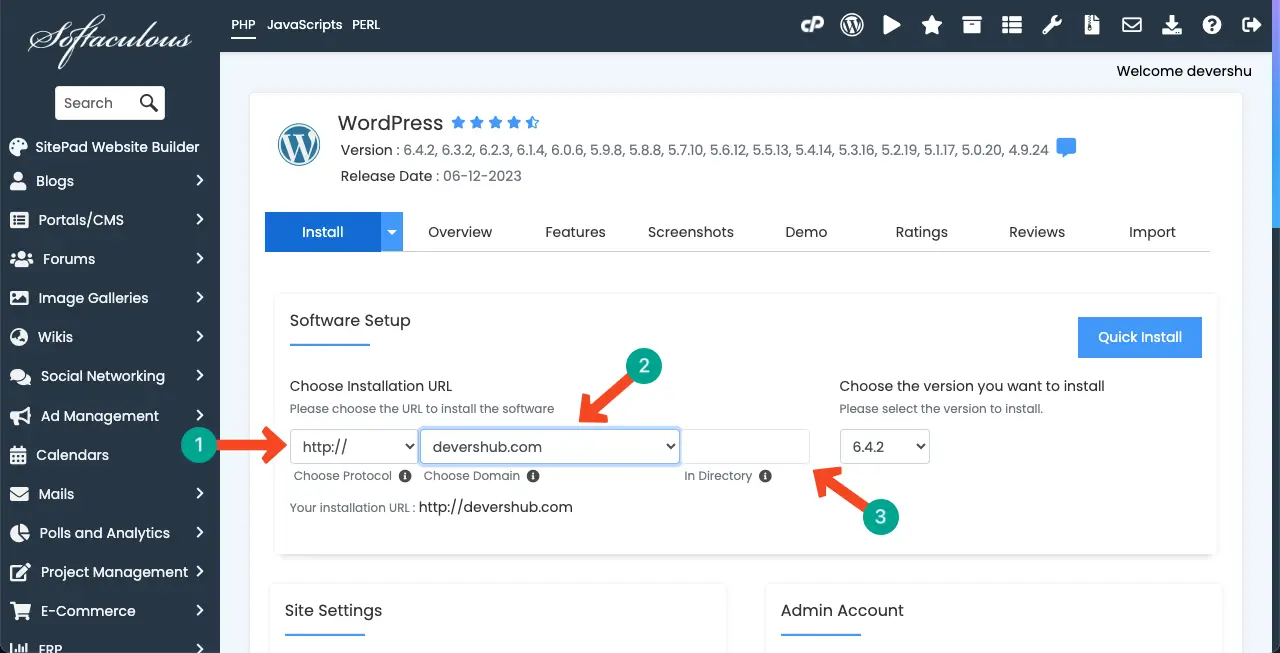
Set the appropriate protocol (usually “http://” or “https://”) based on your website’s security settings. If you have an SSL certificate installed, choose “https://”
Select the domain you want to install from the dropdown menu. If you have multiple domains associated with your hosting account, choose the one you wish to use. Leave the Directory field blank unless you want to install WordPress in a subdirectory.
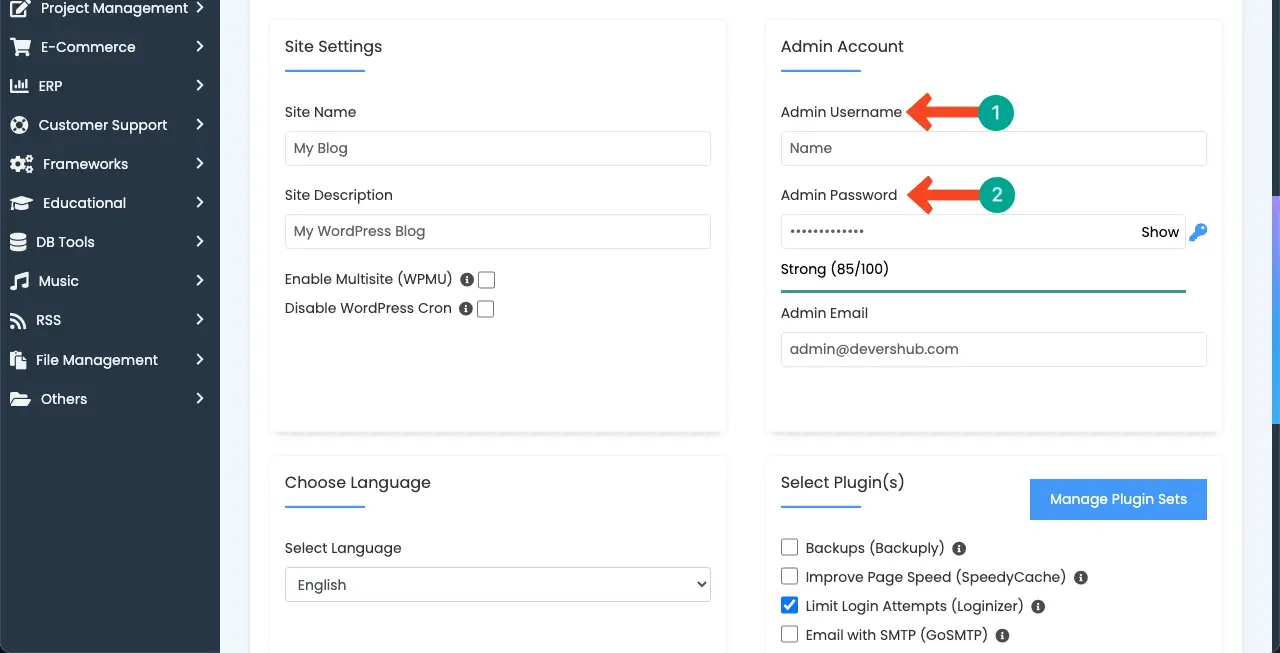
Enter the site name and description for your WordPress website. These can be changed later from within the WordPress dashboard. Set a username and password for your WordPress admin account. This will be used to log in to the WordPress dashboard.
Select the language you want to use for your WordPress installation. Some cPanel may suggest you choose specific plugins or themes to be installed with WordPress. You may skip this step and manually install plugins and themes later.
After providing the necessary information, scroll down the page. Click the Install or Submit button to start the installation process. The installer will create the necessary database and install WordPress on your chosen domain.
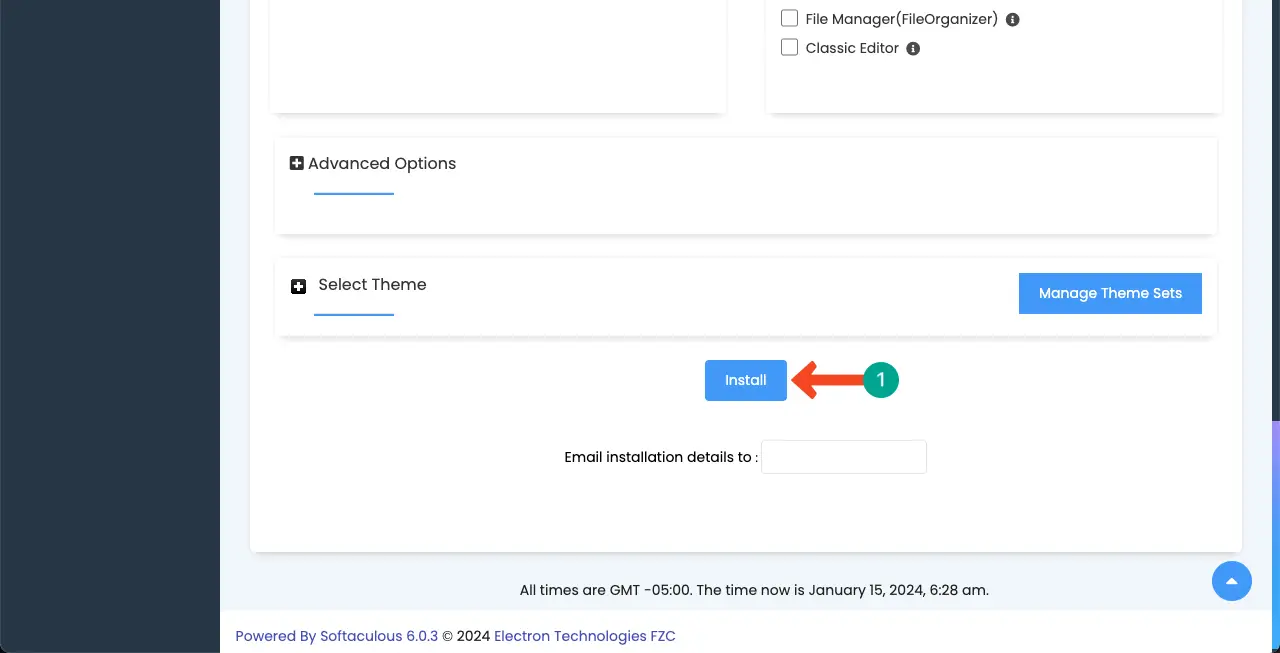
Once the installation is complete, you will receive a confirmation message with login credentials and a link to access the WordPress dashboard. Use the provided link or enter your domain name followed by “/wp-admin” (e.g., “example.com/wp-admin”) to access the WordPress login page.
Enter the username and password you’ve set during the installation process. After logging into successfully, you will be directed to the WordPress dashboard. There you can customize and manage your website.
Step 05: Install a Theme
A theme is a pre-designed file of templates that control the visual appearance of a website on WordPress. It allows you to customize the design and style of your website without modifying the underlying code. Follow the below guide to install a theme.
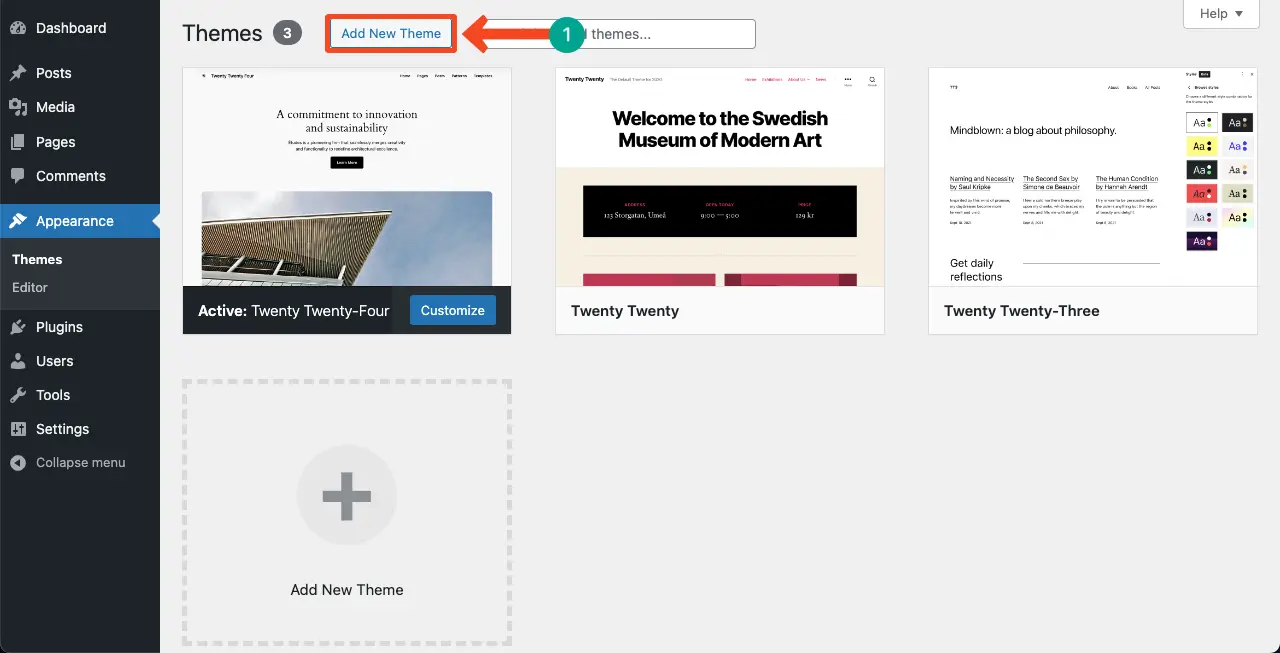
Navigate to Appearance > Themes. This will direct you to the theme page, where you can manage and install themes. Click on the Add New button. If you have a specific theme in mind, type its name in the search bar.
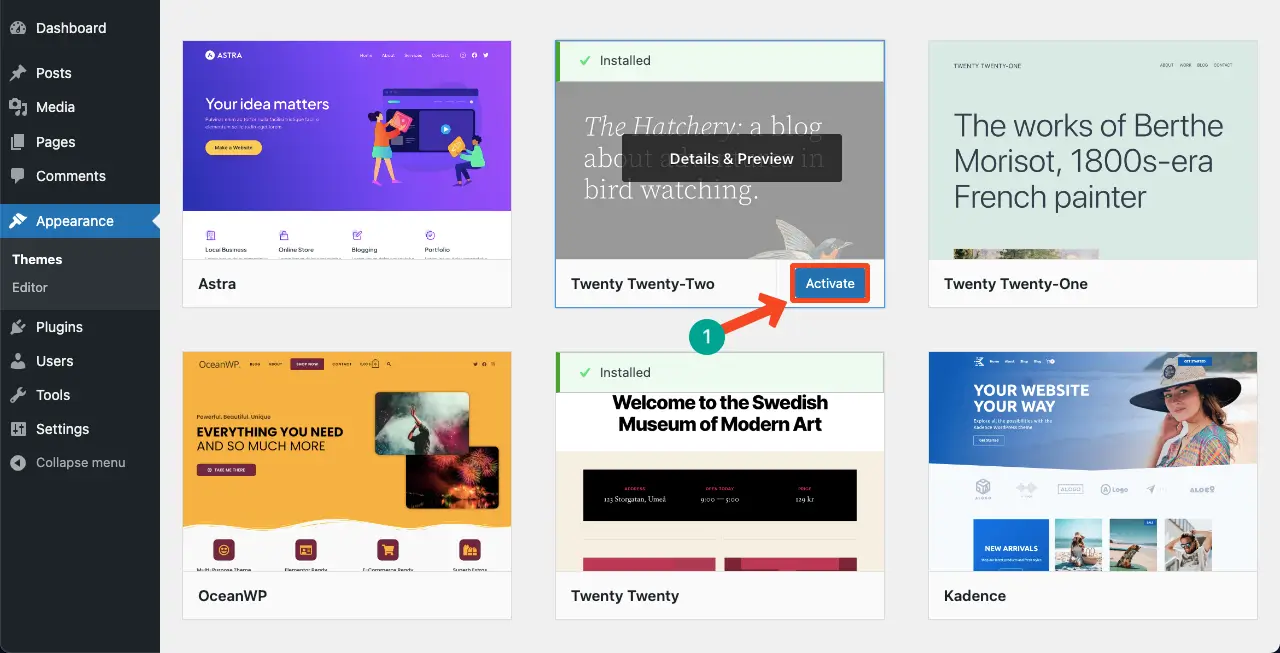
Once you find a theme, click the Install button. WordPress will download and install the theme files on your website. After installation, press the Activate button. Your website will start using the selected theme’s design.
There are several things you must consider when selecting a theme. Ensure the theme is mobile-friendly so it can easily adjust on different screen sizes. Look for a clean, professional, and appealing layout to enhance user experience.
The theme must provide various customization settings like color schemes, typography options, and layout variations. Verify it’s compatible with popular plugins you may want to use, like SEO, contact form, eCommerce, and page builder plugins.
Select a theme that offers 24/7 support and releases updates whenever they detect a bug. Finally, check its loading speed, SEO performance, ratings, and reviews.
Step 06: Configure the Necessary Settings
Configuring the general settings in WordPress means defining basic information and the behavior of your website. Here are the general settings with guides you must configure on WordPress while creating a site.
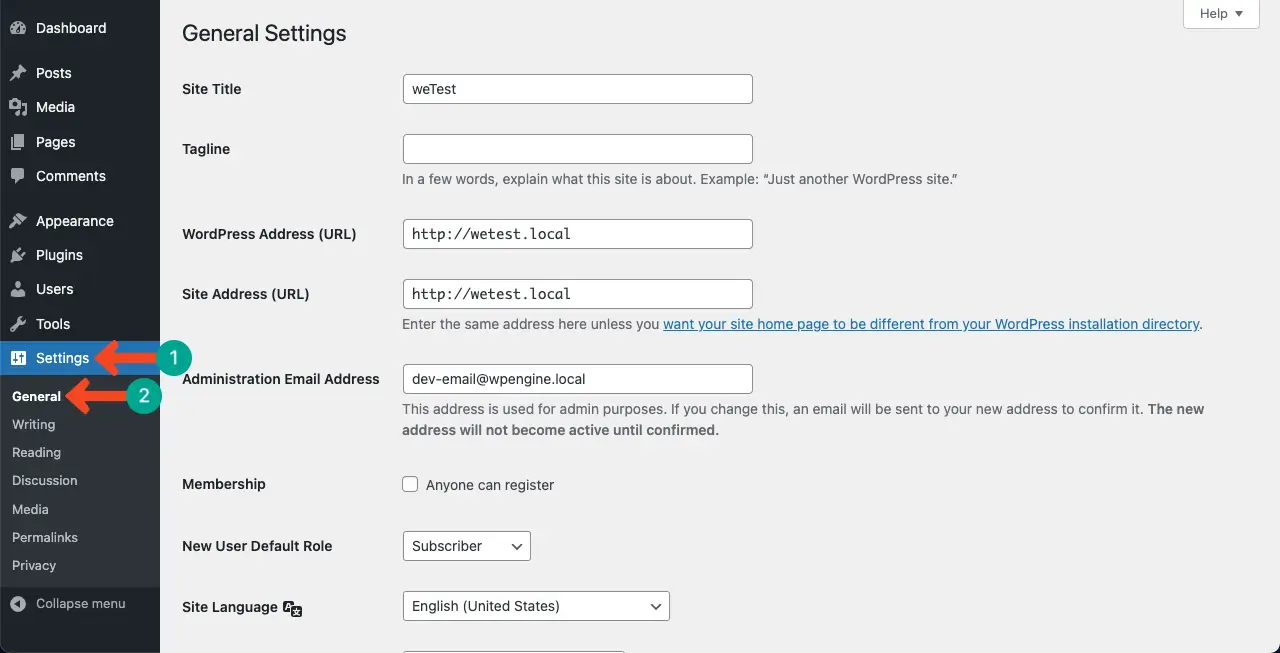
a. Website Title and Tagline
Go to Settings > General. Enter your website’s title and tagline in the Site Title and Tagline boxes.
b. WordPress Address (URL) and Site Address (URL)
These settings determine the URLs used to access your website. In most cases, both URLs should be the same. Use “https://” if you have an SSL certificate installed. If you change these URLs later, ensure proper redirection to avoid broken links.
c. Membership and New User Role
This option controls whether your website allows anyone to register and become a user. To allow user registration, tick the Anyone can register box. Set a default role for them. The available roles are Subscriber, Contributor, Author, Editor, and Administrator.
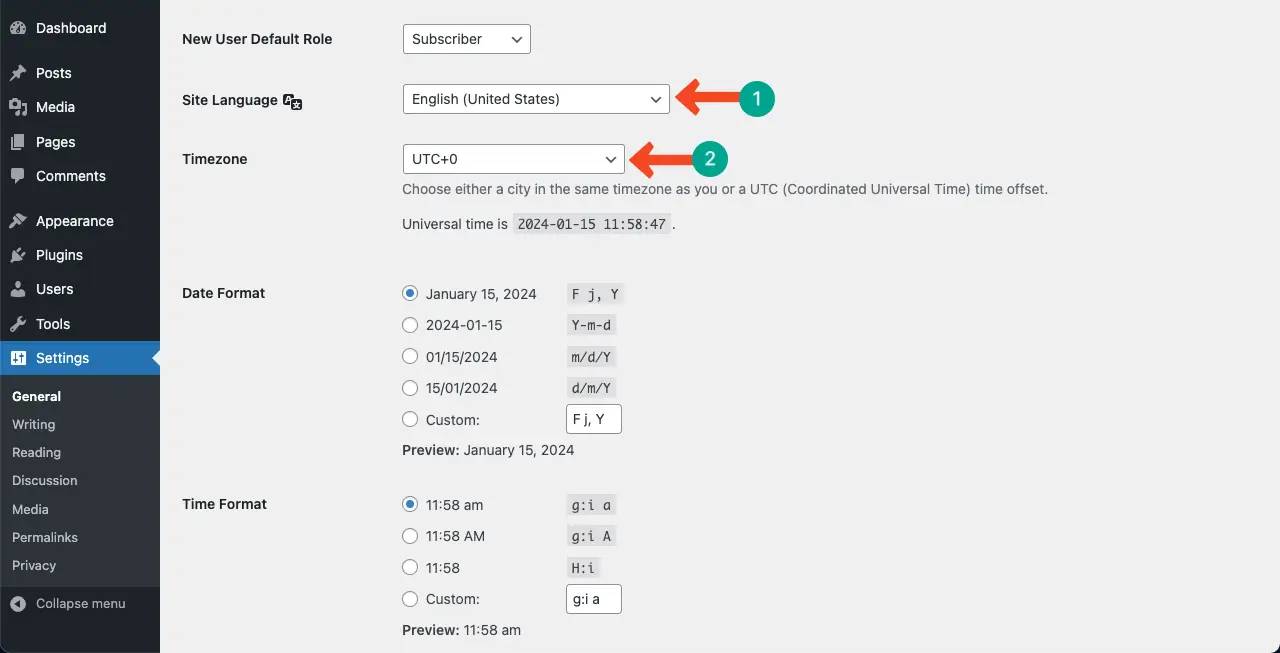
d. Timezone, Date Format, and Time Format
Select your preferred timezone, date, and time formats. These will be applied to your posts, comments, and other time-sensitive actions.
e. Site Language
Select the language in which you want to manage your WordPress dashboard. This will not change the content on the frontend but only on the backend.
After that, you can select a date format and time format for your site that will be used to record your post and page publication and their editing history.
f. Permalink Settings
A permalink is a permanent URL that directs to a specific page or post. The permalink must remain constant, even if the content of the post or page is changed. Choose the suitable permalink style that suits your interests.

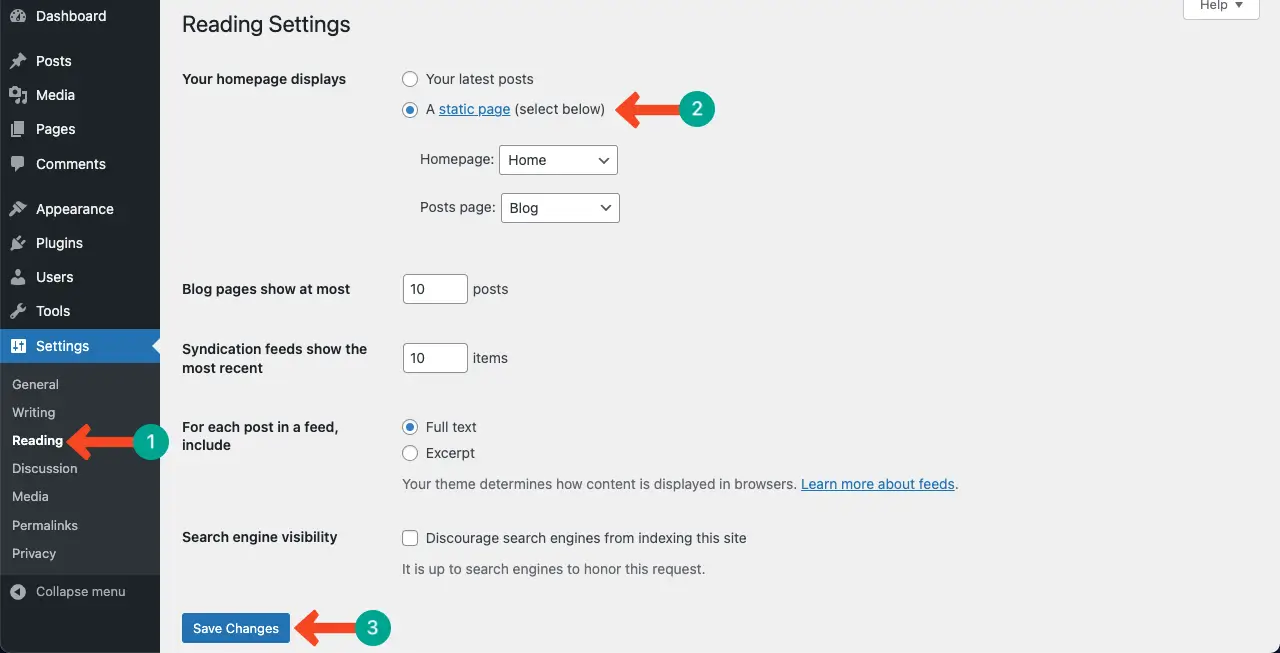
g. Homepage Displays
Go to Settings > Reading. You will find two options in this section. Your latest posts display your most recent blog posts on the front page. A static page sets a specific page as your homepage and the other for blog posts.
We recommend you select the A static page option. Set the home page for the first option and blog posts for the second option.
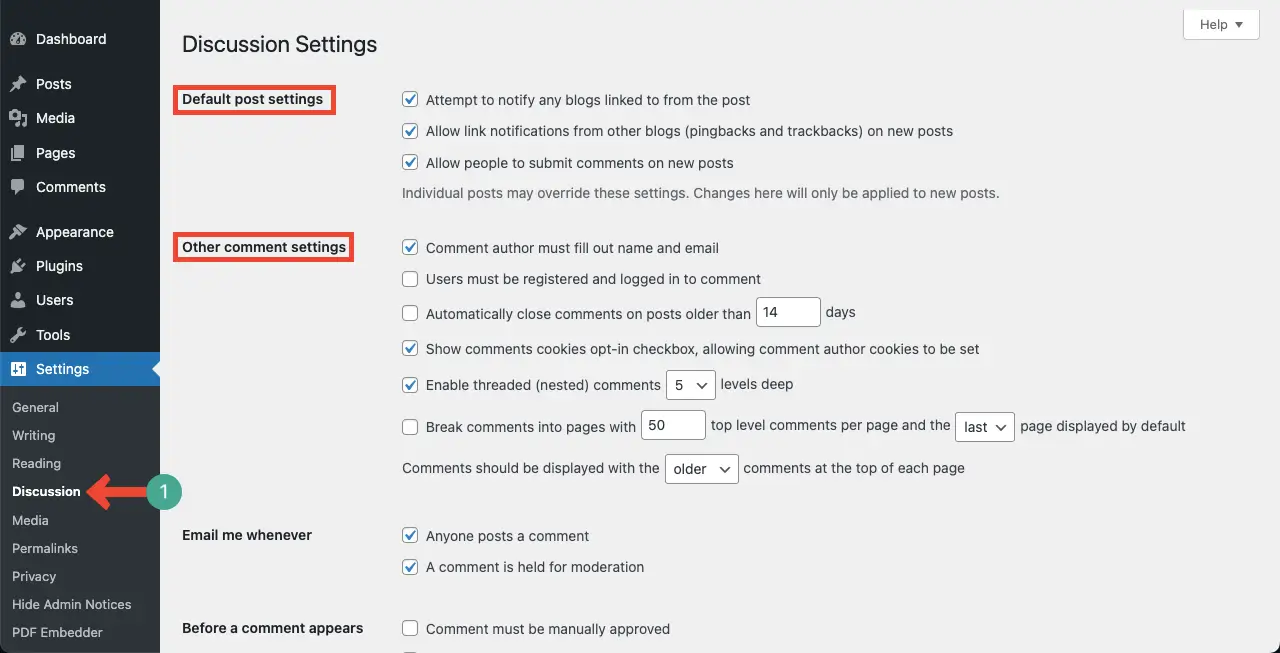
h. Post and Comment Settings
Go to Settings > Discussion. You’ll get options to configure the post and comment settings for your site. Please read them thoroughly, and tick-mark the ones you want to enable for your website.
Step 07: Create Necessary Pages
Go to Pages > Add New Page to create pages in WordPress. Enter a title for the page in the provided field. Add content like text, images, videos, and other media elements. Once you are done, hit the publish button.
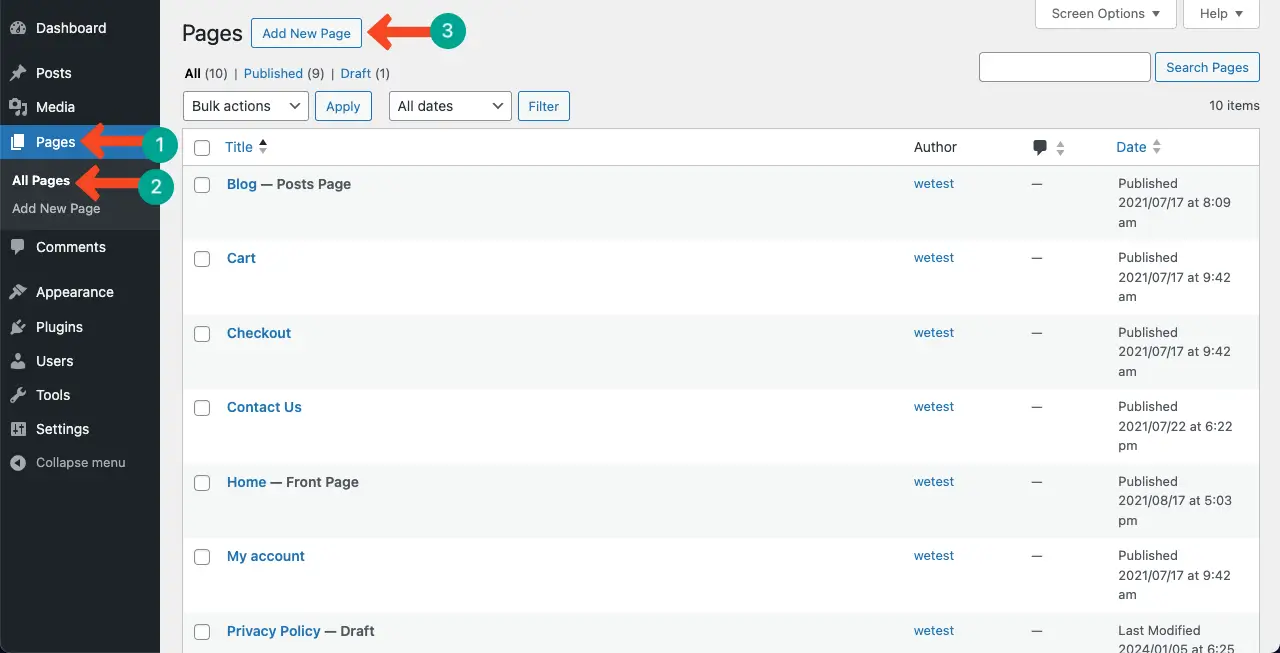
Some of the most common and necessary pages are Home Page, About, Contact, Services, Blog, Privacy Policy, Terms of Services, Portfolio, etc. Several page builder plugins and Gutenberg block editors are available online that you can use to design visually appealing pages.
Popular page builders are Elementor, Beaver Builder, Divi, Oxygen, and WP Bakery Builder. Similarly, renowned Gutenberg block plugins are Ultimate Blocks, Spectra, and Essential Blocks.
Step 08: Install Plugins for Extended Functionalities
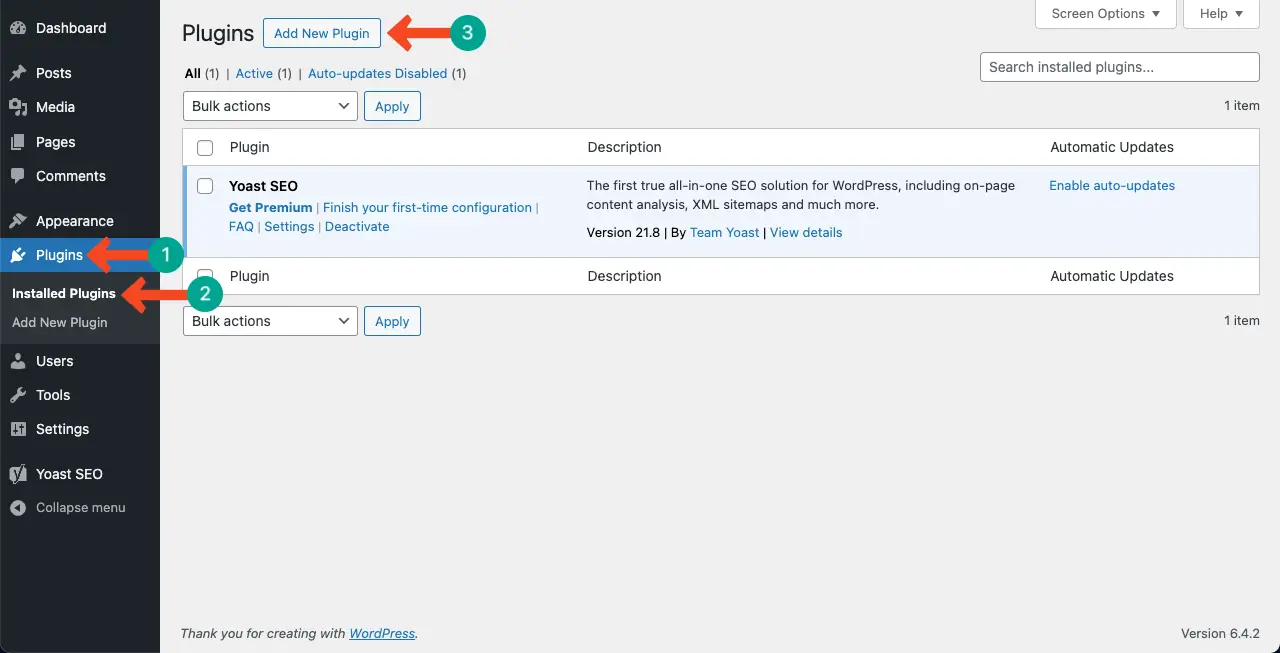
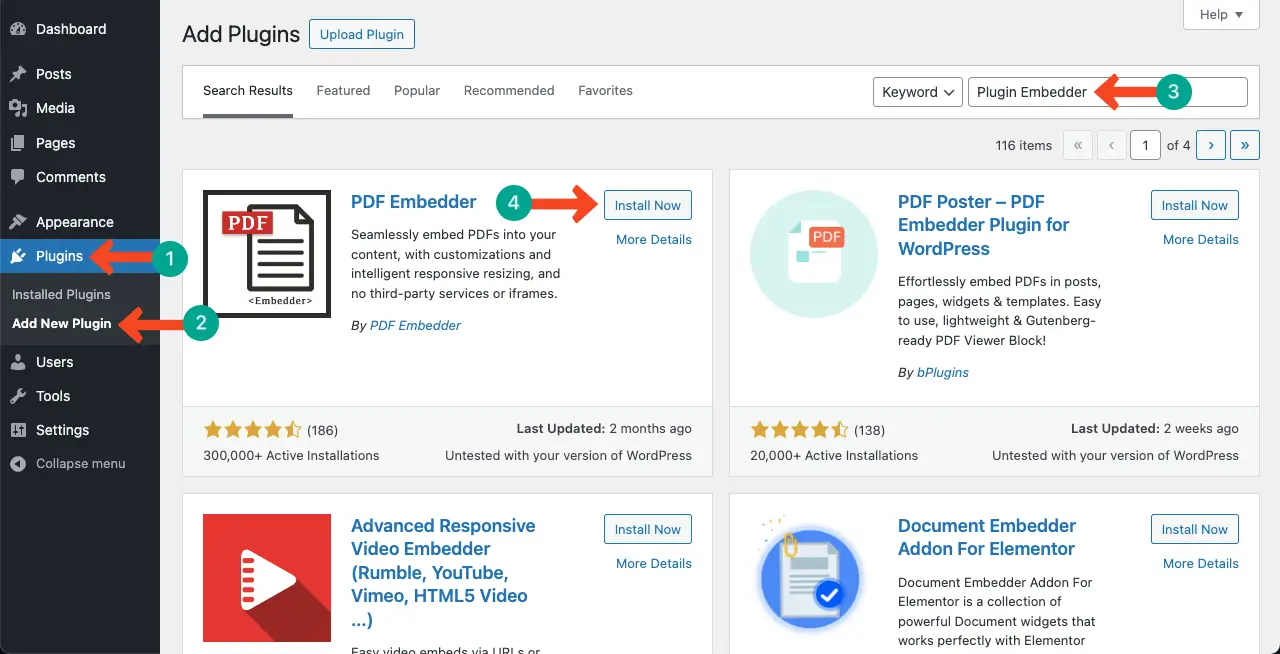
You can extend your WordPress site’s functionalities using different plugins. Go to Plugins > Add New to install a new plugin. Type the name of your desired plugin in the search box. Once it appears below, Install and Activate it.
Plugin selection must intersect your website and niche choice. But no matter what type of site or niche you have, there are certain plugins that all websites must have for basic functionalities. Let’s explore them:
a. Select SEO Plugin
Decent SEO plugins can help to improve the quality and quantity of your web traffic. Yoast is a brilliant user-friendly SEO plugin. It has a comprehensive set of features both for professionals and beginners.
Rank Math SEO is another best-performing plugin. It provides you with real-time SEO score for your content. But the plugin has too many features that are usually complicated for beginners.
b. Caching Plugin To Speed Up Your Site
Caching plugins alleviate the load on your hosting servers to enable your website to run faster. Usually, visitors bounce away from websites that are slow to load. Thus, it seriously hampers the conversation rate.
We are suggesting some top cache plugins that you may consider depending on your needs: WP Rocket, W3 Total Cache, WP, Super Cache, Jetpack, and Sucuri Firewall.
c. Active Web Security Plugin
Web hosting providers usually provide essential server security. But keeping your website safe from cyber and malware attacks is up to you. That is why; you must install a web security plugin on your website.
Quality security plugins activate security monitoring, file scanning, malware scanning, firewalls, post-hack actions, blacklist monitoring, and notification when a security threat is detected.
Powerful web security plugins for WordPress sites that you may consider are Sucuri, Wordfence, iThemes Security, Jetpack, and Bulletproof Security.
d. Use Backup Plugin To Store Data
It also belongs to the part of web security. Using the backup plugin, you can quickly restore all your data in case your site crashes or is hacked.
BlogVault, WPVivid, WP Database Backup, Backup Buddy, etc. are some user-friendly WordPress plugins. You can use them to create an on-demand backup and upload it to your defined drive and server.
e. Use a Social Sharing Plugin
To build an online presence and promote a website, social sharing plugins make the route easy. These plugins allow visitors to share your web content to their social networks.
The best social sharing plugins that can save you time are Social Snap, Monarch, Easy Social Share Buttons, Social Warfare, Simple Social Buttons, and Novashare.
f. Analytics To Measure Web Performance
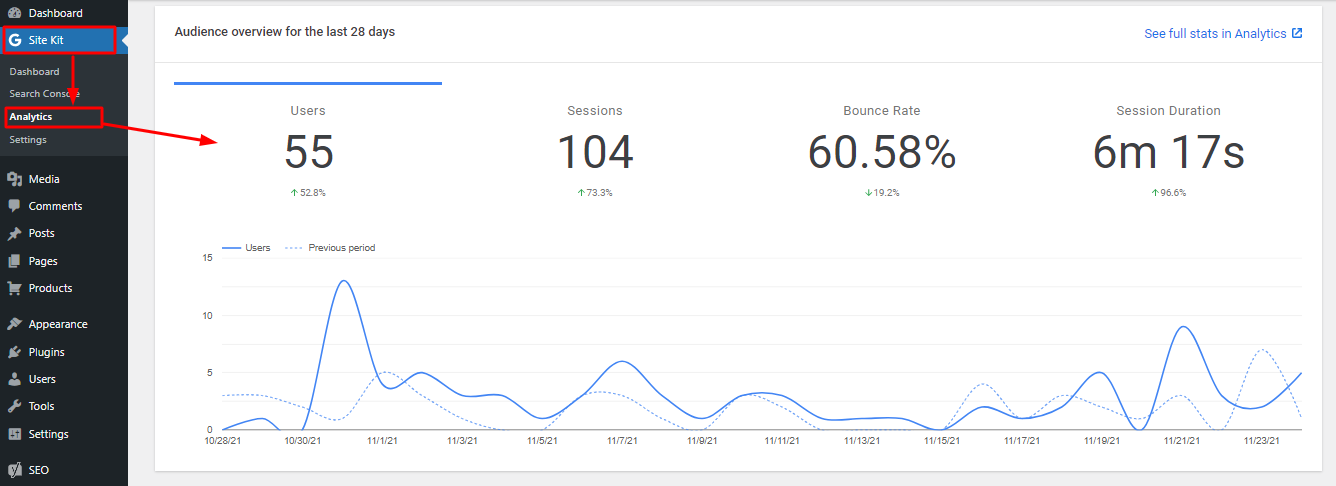
It facilitates you in measuring the performance of your website. Using web analytics, you can have a quick synopsis of the number of leads, traffic, referrals, source of traffic, ad performance, social share, etc.
If you are looking for some amazing web analytic plugins, Google Site Kit, Jetpack Heap, WP Statistics, and MonsterInsight can fulfill your wish.
Bonus: Things To Consider After Installing WordPress
Users often question themselves: What should they do right after creating a website? Once you are done with installing WordPress, there are several things you must check on regular occasions. They are:
1. Keep Backup Your Site Regularly
Most of the backup plugins automatically upload web content to the specified drive once enabled. Just check if the activation is smoothly working.
2. Clean Up Caches
Apart from improving speed, cleaning up the cache can improve web performance, mitigate privacy threads, and let the new version work fast. So, you cannot ignore the point on your regular checklist.
3. Use Analytics To Measure Web Performance
Measuring web performance can help you to discover new ways to grow your website. Page view, conversion rate, time on site, bounce rate, etc. are the common metrics you must analyze to check your web progress rate.
d. Protect From Spam Attacks
Your website can be spammed in various ways: social media, email, traffic, and links. So, you have to handle issues in multiple ways. Sometimes, you have to drag messages down to the spam folder and sometimes activate captchas to avoid traffic storms.
e. Delete Or Update The Old Contents
Google only wants your best, useful, and relevant content. Old content naturally loses SEO value and hampers domain authority. Therefore, you must update your old content if it has SEO value; otherwise, delete it.
FAQ on How to Create a Website on WordPress
I will now answer some questions that might have poked your mind while reading this long post or following this write-up to create your website.

How much does it cost to build a website on WordPress?
Building a website on WordPress can vary in cost depending on various factors such as hosting, themes, plugins, customization, and development.
# Minimum cost to build a site on WordPress
The minimum cost to build a basic WordPress website is estimated to be around $50-60 per year. This includes the cost of decent hosting and a domain name. However, this estimate assumes that you are using all free extensions and have a very basic website.
# Maximum cost to build a site on WordPress
The maximum cost to build a WordPress website can vary significantly. If you hire a designer or developer to create a custom website, you can expect an upfront charge of around $6,000, with an ongoing cost of $1,000 per year. The cost can be even higher if you have specific requirements or need extensive customization.
Where can I find free WordPress themes?
You’ll find tons of free WordPress themes in WordPress.org. From here, you can download your desired theme and then, upload and activate them on your live site.
Besides, to avoid the hassle of downloading, you can explore and install any of the free themes from your live website as well.
Go to Appearance > Themes. Click the Add New Theme button.
Explore and decide on a theme you like. Click the Install and Activate button within it.
Where can I find free WordPress plugins?
Like themes, you’ll find thousands of free and different types of plugins on WordPress.org. From here, you can download your desired plugin and then, upload and activate them on your live site.
Here again, you can install the plugin staying on your live site to avoid the hassle of downloading one.
Go to Plugins > Add New Plugin. Explore and find the plugin you want.
Install and activate it.
Can I build a live WordPress website for free?
It’s hard to build a live website for free, no matter if it’s on WordPress or any other CMS. Because there are some mandatory costs like domain and hosting.
Although some hosting companies offer free hosting with very limited space, I haven’t found any agency offering a free domain.
This means, there is no way to create a live website on WordPress for free of cost.
Which is better: WordPress or Wix?
If you are looking to create a simple blogging site, news portal, affiliate marketing site, agency site, etc., WordPress will be the best choice.
If you want to create an eCommerce website with less technical hassles, Wix will be a good choice.
Note: You can create eCommerce websites with WordPress as well. However, setting up the site using the necessary plugging will be a bit time-consuming and hassling for newbies. Wix is quite relaxing comparatively.
Conclusion
Creating brand-new websites is no longer difficult today. CMS like WordPress has made it super easy. If you have the right guide at hand, you can effortlessly create a new website with WordPress, even if you are a beginner.
In this article, we have tried our best to cover a comprehensive guide on how to create a website with WordPress. We’ll keep writing more and more articles to cover all the steps we have covered here separately in other posts. Stay tuned with us for coming updates.
