Imagine being able to share your podcast episodes, music tracks, or audio interviews directly on your website, without the hassle of installing multiple plugins. For those who have visual issues with their eyes and can’t keep looking at digital devices for long, audio files are an efficient option to engage them.
According to a report by WHO, published in 2019, somewhere around 2.2 billion people worldwide suffer from vision impairment. This number might have increased over time. By adding audio files of your blog posts, articles, news, tutorials, and stories, you can enable them to hear your content
There are various ways to add an audio file to WordPress. In this post, I will show you how to add an audio file to WordPress in multiple ways. Get started!
What Is an Audio File?
An audio file is a digital recording of sound. It can take various formats, like MP3, WAV, AAC, etc. You can use audio files for various purposes, from background music on a website to sharing educational audio lessons. Audio files offer a powerful means of communication.
They can evoke emotions, convey information, and enhance storytelling. With the increasing popularity of podcasts and audio-based content, incorporating audio files into your WordPress site can help you stand out from the crowd and connect with your audience in a more intimate and personal way.
What Are the Use Cases of Audio Files in WordPress?
By leveraging the capabilities of audio files in WordPress, website owners can create a dynamic and interactive online presence. Whether it’s for entertainment, education, or enhancing the overall user experience, audio files offer a versatile tool for engaging with visitors.
Let’s explore some use cases for audio files in WordPress.
1. Music
Musicians and bands can showcase their original compositions, albums, or singles by uploading audio files directly to their WordPress site. This allows visitors to listen to their music and discover their talent.
2. Podcasts
Podcasters can share their episodes and series on their WordPress site. By uploading audio files, they can create a dedicated podcast section, making it easy for listeners to access and enjoy their content.
3. Sound Effects
Websites that require sound effects, such as gaming or multimedia platforms, can incorporate audio files to enhance the user experience. From button clicks to background ambience, audio files can add an immersive element to the website.
4. Audio Interviews
Bloggers, journalists, or content creators can conduct and share audio interviews with industry experts or influencers. By embedding audio files, they can provide their audience with valuable insights and engaging conversations.
5. Language Learning
Websites focused on language learning can utilize audio files to provide pronunciation examples, dialogues, or audio exercises. This helps learners improve their listening and speaking skills.
6. Educational Content
Educational websites can include audio files to provide audio lectures, language lessons, or audiobooks. This allows learners to access content in an auditory format, catering to different learning preferences.
8. Voiceovers
Websites that require voiceovers for videos, animations, or presentations can upload audio files to accompany visual content. This creates a more engaging and informative experience for the audience.
9. Background Music
Websites that aim to create a specific ambiance or mood can add background music using audio files. This can be particularly useful for creative portfolios, event websites, or online stores.
How to Add an Audio File to WordPress: Two Methods
You can upload audio files to WordPress in two ways: to the WordPress Media Library and directly to posts/pages. Both of them have unique processes and sets of benefits. I will now show you how to add an audio file to WordPress using these two methods.
Method One: How to Upload Audio to WordPress Media Library
This one is a very simple method. You don’t have to depend on any plugin or special any feature in this method.
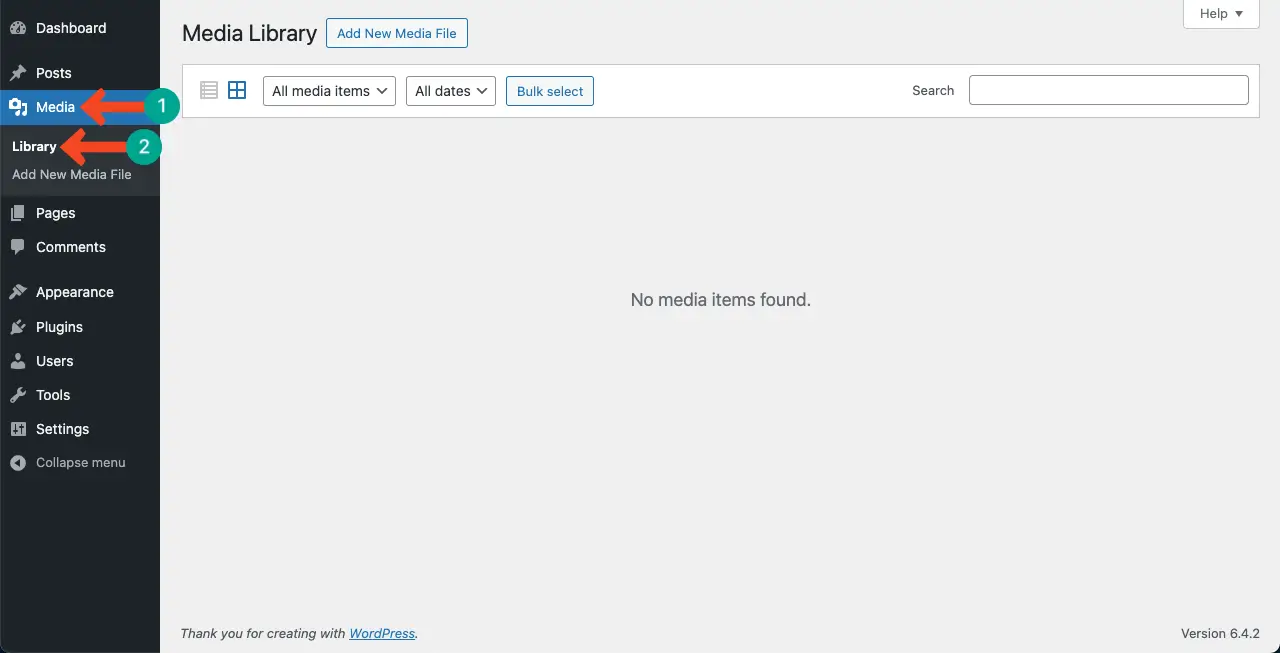
Step 01: Go to WordPress Media Library
Log into your WordPress backend.
Navigate to WordPress Dashboard > Media > Library.
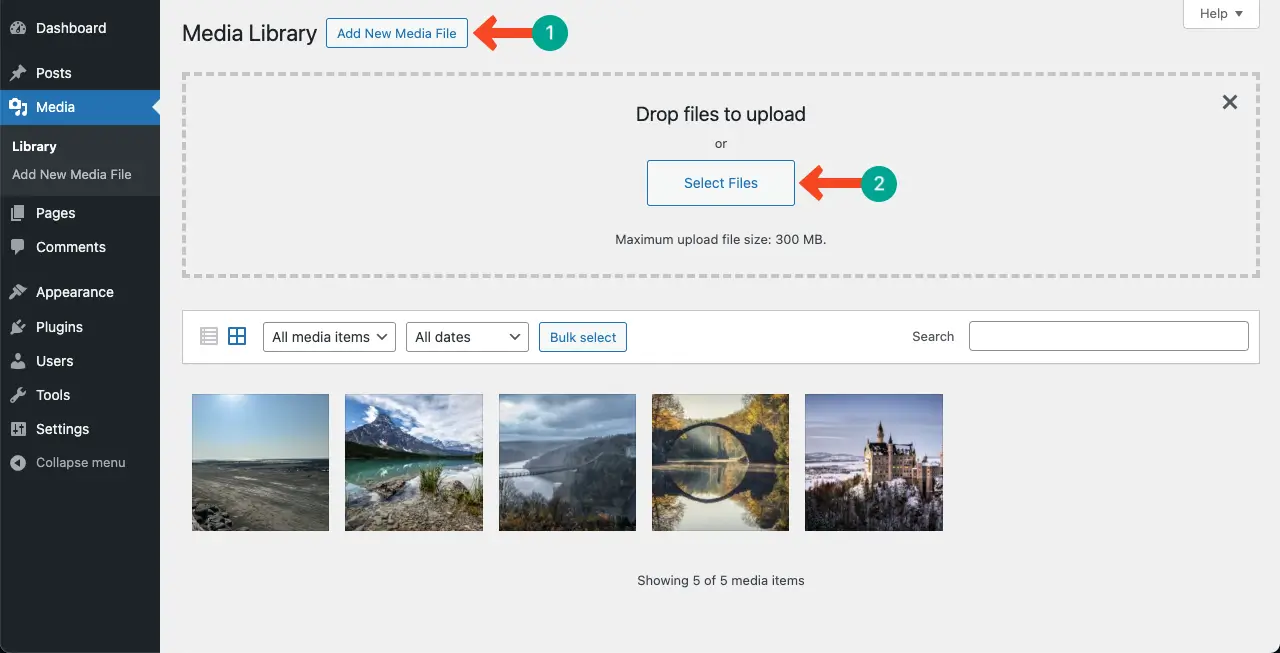
Step 02: Start Adding the Audio File
Hit the Add New Media File button. On the new section, click the Select Files button.
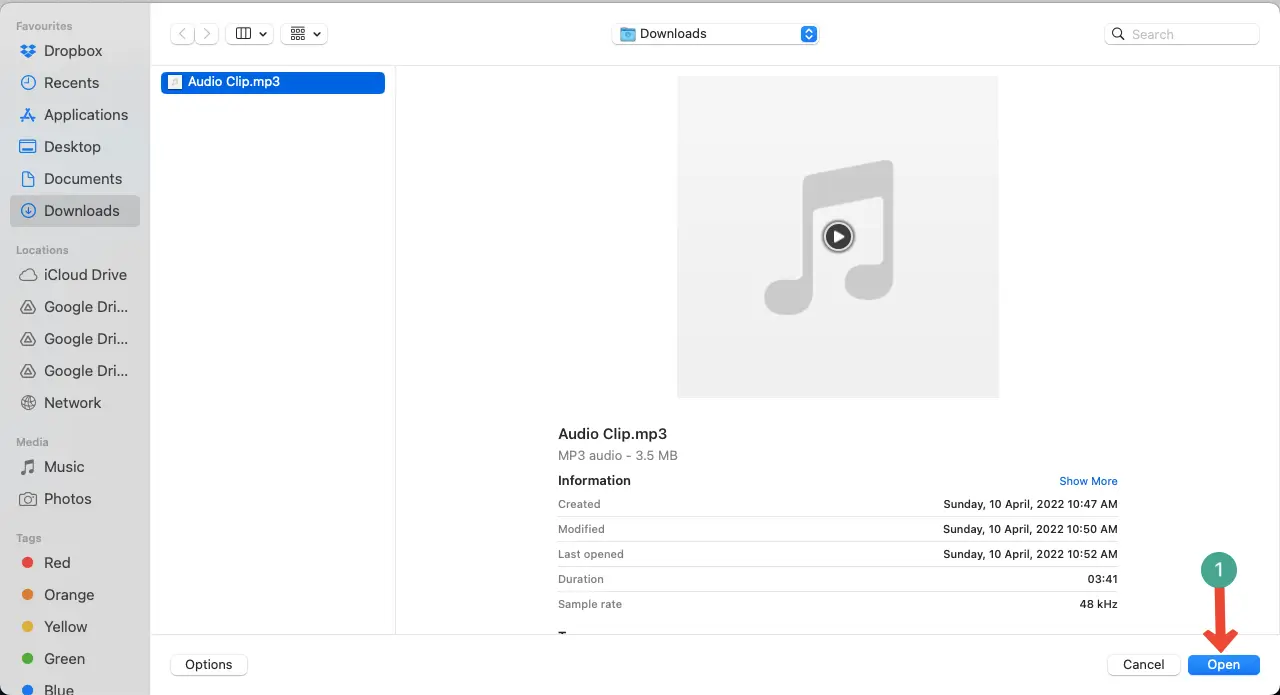
Step 03: Select the Audio File From Your Preferred Drive
You’ll be allowed to select your audio file from the local drive or cloud storage. Select the file and click the Open button at the bottom-right corner.
Note: Name the audio file before uploading it so you can quickly find it later.
Step 04: Check If the File Has Been Uploaded to the Media Library
You can see the audio file has been uploaded to the WordPress Media Library.

Method Two: How to Upload Audio to WordPress Posts and Page
You can directly upload audio files to your WordPress posts and pages depending on your needs and requirements using the WordPress Audio Block. Here’s how to do this.
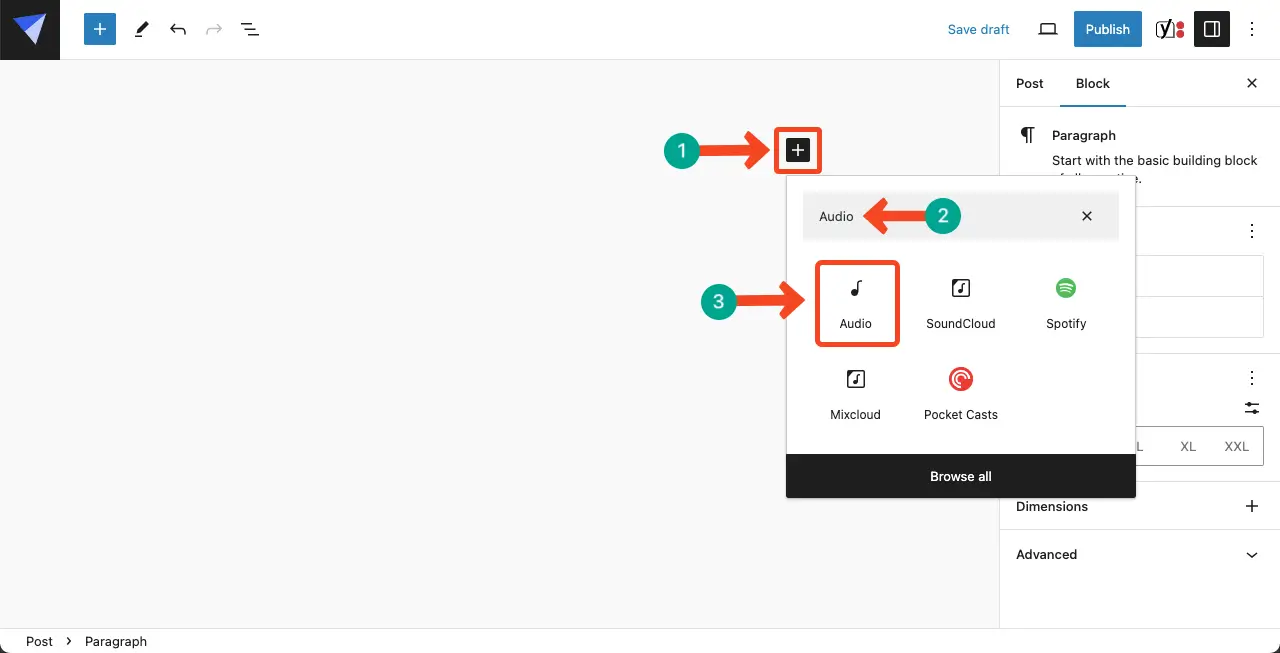
Step 01: Add the WordPress Audio Block to Your Post/Page
Open a post/page. Add the WordPress Audio block to the Gutenberg editor.
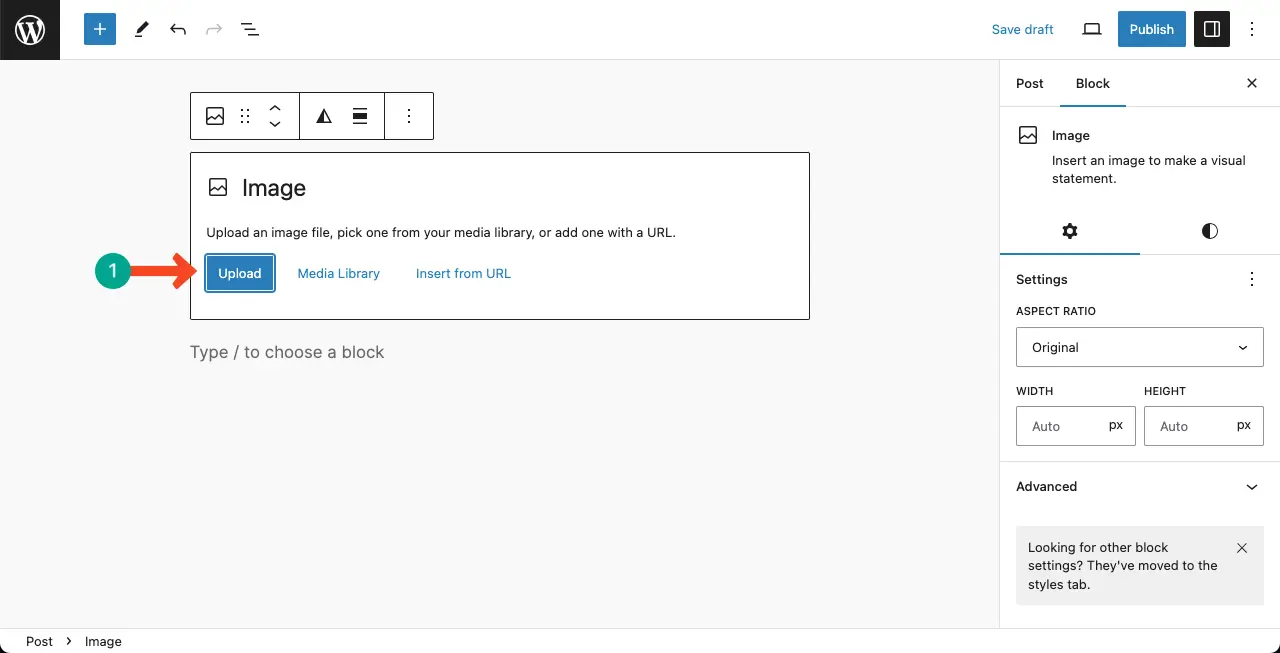
Step 02: Upload the Audio File to the Post/Page
To upload a new audio file, click the Upload button.
Step 03: Select the Audio File
Select the audio file from your local drive or cloud storage. Press the Open button at the bottom-right corner.
You can see the Audio file has been uploaded to your post/page. Explore other different types of media files in WordPress.
Best Practices for Adding Audio Files in WordPress
Audio files aren’t a common element for blog posts. They are mostly used in audio streaming platforms like Spotify, SoundCloud, Apple Music, and YouTube. So, you must consider some best practices when adding and using audio files in WordPress. They are:
1. Optimize the Audio File
Before uploading an audio file to WordPress, optimize it for web playback. Reduce the file size without compromising the audio quality to ensure faster loading times and a smooth playback experience for your visitors.
2. Choose the Right Audio File Format
Select the appropriate audio file format for your content. MP3 is the most widely supported format and offers a good balance between file size and audio quality. However, consider using alternative formats like AAC or OGG, which may provide better compression and quality in certain scenarios.
3. Organize Your Audio Files
Maintain a well-organized media library in WordPress. Create folders or use tags to categorize your audio files based on the type of content, genre, or any other relevant criteria. This makes it easier to locate and manage your audio files as your library grows.
4. Use Descriptive Titles and Metadata
Give your audio files descriptive and meaningful titles that accurately represent the content. Additionally, add metadata such as artist name, album title, and copyright information to provide proper attribution and improve searchability.
5. Embed Audio Files Strategically
Embed audio files in relevant posts or pages to create a cohesive user experience. Consider the context in which the audio content will be consumed and choose appropriate placements that complement the surrounding text or visuals.
6. Test Audio Playback Across Devices
Test the playback of your audio files on different devices and browsers to ensure compatibility and a consistent experience for your audience. This includes testing on mobile devices, tablets, and various web browsers to ensure seamless playback across platforms.
Use HappyMedia to Manage Audio and Other All Media File Types
HappyMedia plugin is a WordPress plugin designed to enhance media file management within the WordPress platform. It offers features to simplify the organization, upload, and optimization of various media assets, including photos, videos, GIFs, documents, audio files, and more
The plugin aims to provide a comprehensive solution for managing media files within WordPress, offering benefits such as improved organization, support for various file types and simplified technical aspects of media management.
If you have tons of different types of media files and are feeling messed at managing them properly in the media library, this plugin could be a great solution for you.
FAQ on How to Add Audio File to WordPress
How can I add audio files to my posts/pages in WordPress?
You can add audio files to your posts and pages in WordPress using the WordPress Audio Block.
The process of using the WordPress Audio Block has been explained in the above part of this post.
Does WordPress support audio files?
Yes, WordPress supports adding and uploading audio files directly to your website. You can easily incorporate audio files into your WordPress using its built-in features and functionality.
What audio files does WordPress accept?
WordPress accepts a variety of audio file formats for uploading and embedding on your website. The most well-known of them are MP3, MP4, OGG, and WAV.
Which audio file types are supported by all browsers?
MP3, OGG, and WAV audio file types are supported by all browsers.
Can I compress audio files before uploading them to WordPress?
Yes, you can compress audio files before uploading them to WordPress. Compressing audio files can help reduce their file size, making them load faster on your website and saving storage space.
What are the best online audio compression tools?
The best online audio compression tools are Online Audio Converter, CloudConvert, AudioCompressor, and XConvert.
Conclusion
Throughout this blog post, I have explored the step-by-step process of uploading audio files to WordPress. I have also introduced you to a robust media file management plugin. Furthermore, I have emphasized the importance of using descriptive titles, adding metadata, and considering accessibility to ensure a seamless and inclusive user experience.
If you love this post, let me know your feedback through the comment box below. I invite you to keep exploring my other blog posts as well.